Git Version Control via Command Line
- Authors
- Topics:
Introduction
This post introduces the main concepts in Git and basic Git commands that can be used from the command line. Understanding these commands will help you with using Git in a code editor, the Git desktop and other options, like GitHub online.
Learning Outcomes
After completing this learning resource, you will:
- be familiar with Git terminology
- be familiar with the Git workflow
- be able to install Git
- understand essential Git commands
- be able to use Git commands in the terminal / command line
Version Control and Tracking Changes
Git’s main purpose is to track changes in files and folders of a project, either for yourself or when working collaboratively in a team. It works best when used with plaintext file formats such as source code, XML/TEI documents or Markdown content. While Git will happily store images, audio files, or .doc and .pdf documents, it is not able to help you with changes in documents in so-called binary formats.
Git
- solves the problem of keeping versions of text documents in sync among sometimes thousands of collaborators working on a software product
- it helps integrate changes by multiple collaborators and also solves situations where two people edit the same part of a document
Git can record which changes, to which documents, have been made when, and by whom. It allows to keep a detailed revision history of a project, because it can save snapshots of a project at specific points in time, allowing to review them any time in the future.
Version control allows to save different versions of content, restores previous versions, and compares different versions. This is especially beneficial when working with multiple documents, and when working in teams (potentially working on the same document).

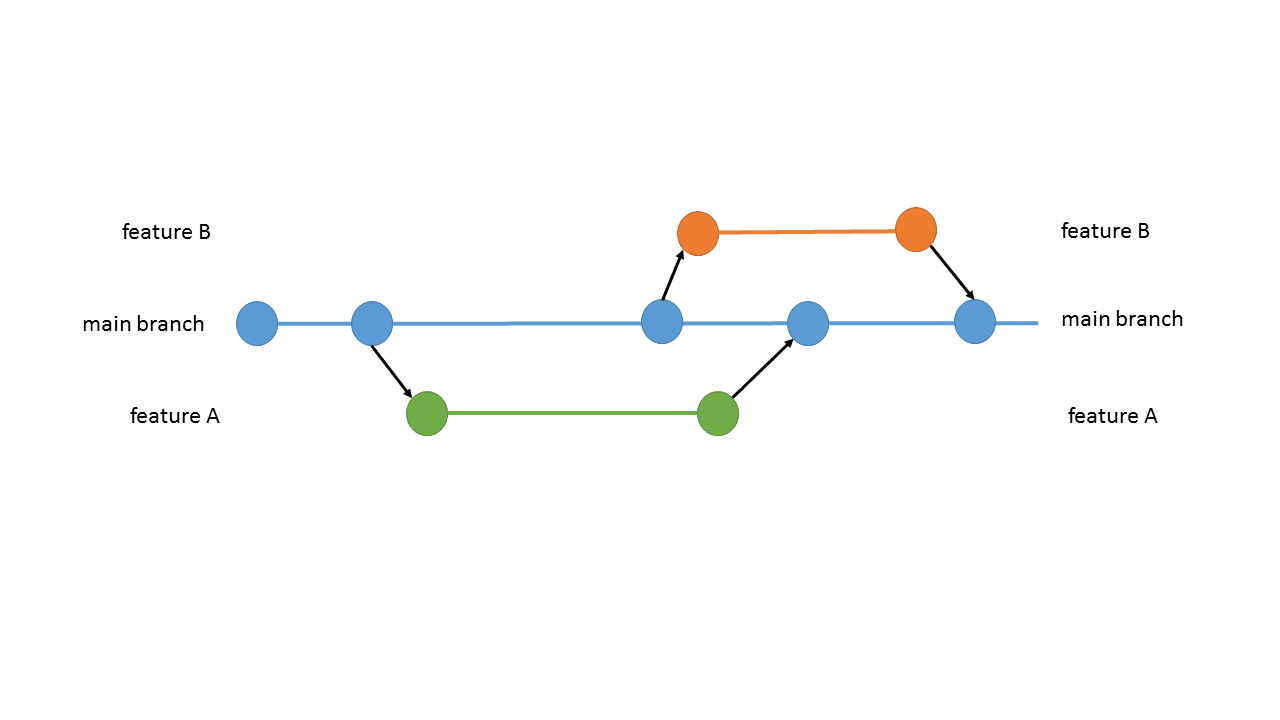
Git’s version control works with branches.
Git allows to create separate branches for changes to any document. For example, in the image above, the document is represented by the main branch. When a change should be created, a copy, the branch “feature A” is pulled from the main branch. Once the change is made, the feature branch is ready to transfer back into the main branch. Similarly, we can fetch a branch “feature B” and create another change. When changes have been committed, it can be pushed back into the main branch, too. Git version control features allow to trace those changes and consider them before they are merged into the main branch.
The paragraph above features terminology (in bold) that will become essential commands that enable us to work with Git.
Official Terminology: Working Area, Staging Area, Repository
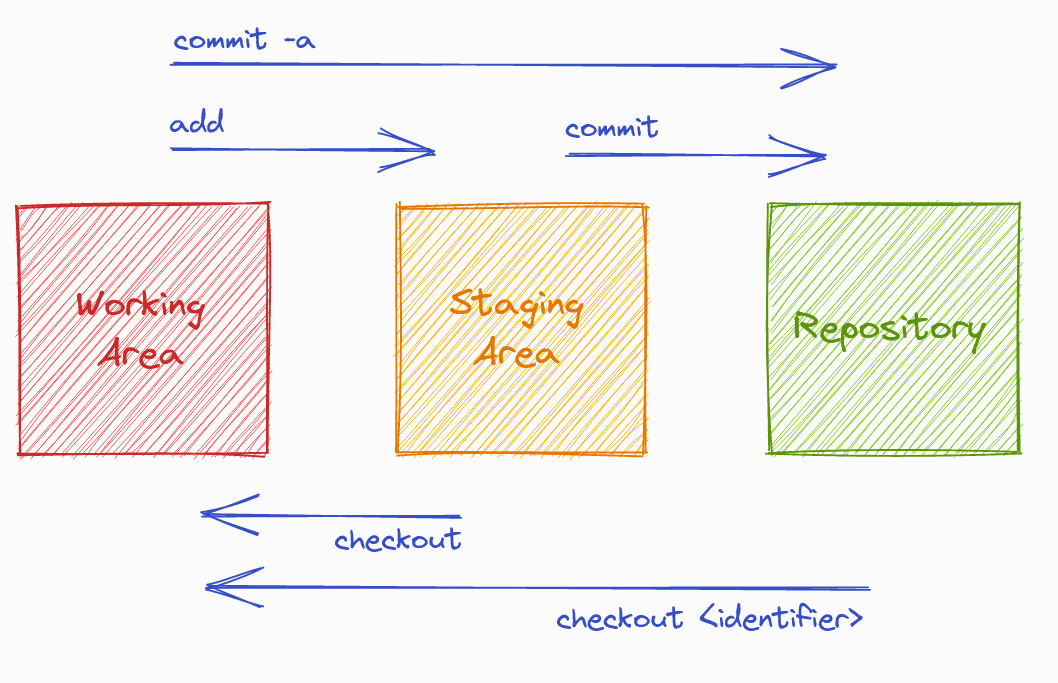
This diagram is a great summary of how content moves in Git, between the “working area”, which is simply the files and folders in a project as they exist on your computer, the “staging area”, which we can call a “holding zone”, and the “repository”, which are the permanently recorded commit snapshots.

Git workflow
- Working area: This is where you manipulate your files. For example, you can make changes to the text in an MDX document. The working area usually resides on your local machine.
- Staging area: This “holding zone” allows to stage changes in your documents, and commit those changes once you are comfortable, and push these changes to your repository.
- Repository: A repository is a central location where the data, files and documents are stored and managed. You can be the sole user of a repository or you can be a collaborator in a team.
Let’s look at how change tracking with Git works in practice, in a local project on your computer (no network connection required). We’ll walk through how to work with Git in the terminal, because that is where Git was originally meant to be used, and because it helps to understand what is actually going on. This involves learning a handful of Git commands, and while that might seem intimidating at first, you’ll see that it becomes second-nature with a bit of practice very quickly.
However, if you prefer to work with Git via a graphical user interface (GUI), take a look at the bonus section at the end of this introduction, which lists some popular editor or operating system integrations.
Installing Git
Initialize a Git Project in Your Terminal
First, we need to tell Git that it should start to manage a project directory and keep an eye on changes to documents there. On a Windows PC, run the program git shell (Git Bash), on Mac or Linux use the terminal of your choice. Navigate to the folder which contains the data you want to version (usually done by typing cd {folder-name}, e.g. cd Documents), and afterwards type:
git init
This will initially set up Git’s internal bookkeeping metadata, which is stored in a hidden .Git folder. Git will respond with:

Initialize an empty Git repository on your local machine.
Let’s also create some new content. In a real research project this would mean editing or adding an XML/TEI document or similar. To demonstrate the mechanics we’ll keep it basic here and use the terminal to create a simple text file. When you want to create a text file via the command line: The text in "", following echo, is the content of the text file which you specify with “filename.txt”, txt being a text file extension.
echo "This is my text document." > my-document.txt
Check Status
We can always check what Git knows about the state of our project with:
git status
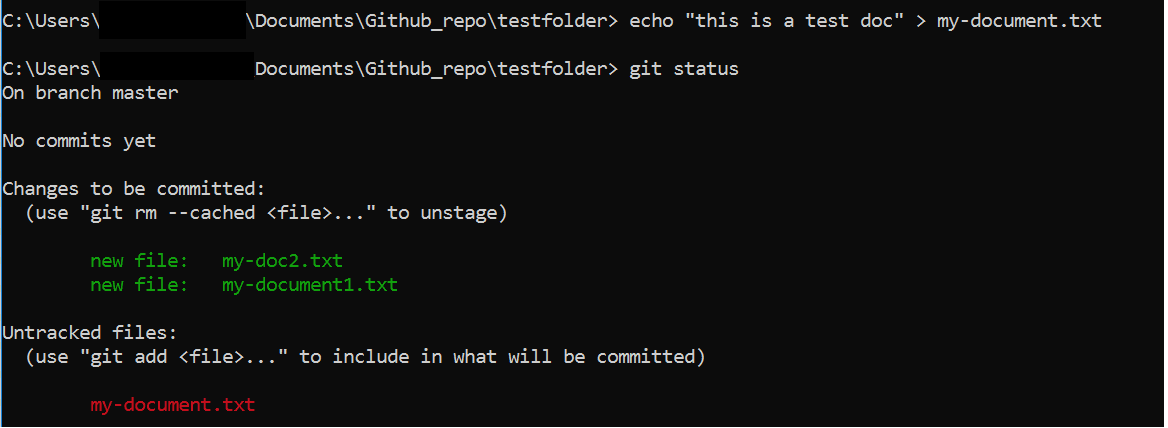
Note that Git informs us that changes have been made to a file called my-document.txt, but that file is currently “untracked”, which means it is not currently managed by Git’s versioning. Git also tells us that, in order to tell it to keep track of changes to that file, we should “use git add to track”. Generally, if you find yourself in situations where you’re unsure how to proceed, git status will most of the time show helpful hints. It’s probably the Git command you’ll be using most often.

In the image you can see that a text file was created and that the status was checked. There are no commits yet, but some changes are already staged, others yet untracked.
Mark Content Changes to be Included in the Version History
Let’s follow the advice and use git add to tell Git to keep an eye on changes to the newly created document my-document.txt:
git add my-document.txt
Note that git add does not automatically commit the changes, but places them in the staging area.
Bundle Changes into Meaningful Chunks
Including content changes in Git’s version history involves a two-step process. First, we put changes in the “holding zone” or “staging area”. We can continue adding related changes to other documents, or additional newly created documents. This allows creating semantically meaningful units of changes.
When all related changes have been added to the “holding area”, we can save them together as a version history snapshot, with a message that briefly describes the changes so it is easy to find them later when viewing the version history.
These units are called “commits”, and “committing” means permanently recording a snapshot of contents at a specific point in time, with a message describing the change:
git commit -m "Add test document"
Every project snapshot we commit to history should include a semantically meaningful set of changes, and this may involve edits to different documents. git add allows to granularly choose which changes to which files should be part of the next snapshot, while git commit will label that set of changes, and actually save a new snapshot.
View history of changes
Getting into the habit of assigning descriptive commit messages is especially helpful when viewing the history of changes. Git will print a changelog with:
git log --oneline
Note that we have one entry in our version history, and that Git has assigned the commit message we have provided, as well as an internal identifier to that entry. That identifier consists of 40 alphanumeric characters, but usually the first few characters are enough to uniquely address a commit in a project.
Below, you see a sample information message that your terminal returns. It includes the identifier, shows where the changes happened and the commit message:
7f733ac (HEAD -> main) Add test document
If you type git log instead, more detailed information will be displayed, including the individual add that are bundled in your commit (if you have any) and the longer internal identifier.
View Individual Snapshot
Git will display the exact changes which were made in a commit snapshot with:
git show 7f733ac
That last bit is the unique identifier which is assigned to every commit in Git’s version history. We’ve seen above how we can figure out these ids from inspecting the changelog displayed with git log. Note that when you have followed the steps in this introduction on your own computer, the unique identifier you see will be different from the one above. This is because identifiers are calculated from filename and content, author, commit message, and commit date.
Compare Two Snapshots
It is also possible to show changes between two specific commit snapshots. Let’s first add another change, so there are actually two separate entries in our commit history (again, how creating and editing a document on the terminal works is unimportant here, but the two-step process of creating a snapshot with git add and git commit should already be familiar):
echo "This is another document." > another-document.txt # creates a new document
sed -i s/text/test/ my-document.txt # changes "text" to "test" in `my-document.txt`
git add -A
git commit -m "Add new document and change initial document"
To list the difference between two commit snapshots, we’ll first find out their respective unique identifiers, and then tell Git to compare those:
git log --oneline
git diff 7f733ac ab9b27f
The format in which the changes are displayed can be a bit hard to read in the terminal, especially for larger changesets, so it’s best to view them in a real text editor.
Time Travel
Alternatively, Git allows to “time travel” to a specific point in a project’s history. You can inspect how each document looked like at that point in time, without losing any subsequent changes:
git checkout 7f733ac
Once you’re done looking around, don’t forget to return to the present! The easiest way is with:
git checkout main
The main identifier is just a shortcut way to refer to the default timeline (it’s actually the default branch of the timeline, because there can be multiple parallel timelines 🤯. Branches were mentioned in the beginning and we’ll have a look at these branches in the post about keeping repositories in sync.
Undo Changes
Finally, Git also allows to undo changes. Even though Git forces us to be very intentional about which changes end up in the changelog (we needed to go through the two-step git add and git commit process after all), sometimes you’ll still want to discard some of them.
There are three possible ways to do this.
git revert ab9b27f
Reverting a commit will keep that snapshot in the version history, and create a new snapshot with the changes removed. This is useful when you want to keep a record of the initial changes, and the fact that they have been reverted.
git reset 7f733ac
Resetting history allows to “rewind the clock” to a specific point im time (addressed via unique identifier), without losing the changes that have been made to documents in subsequent changes. It’s mostly useful as a way to “rewrite” history.
git reset --hard 7f733ac
The most brute-force way to undo changes is with a “hard reset”. Be aware that this will not only “rewind the clock” to a specific commit, but nuke any changes that have been made in the project since that point in time. Those changes will be lost.
Lastly, if you only want to quickly change the message of the last commit, for example because you made a typo, you can:
git commit --amend
Quiz
Training Task
First, install git if you need to do so on your machine.
Second, create a new directory in your home directory (often the C://) called “Howto-Git”.
Use the terminal or the Git shell and navigate to this directory on the command line.
Run the git init command.
Create a new document called teapot.txt with this text (you could also do this outside the command
line):
- I'm a little teapot Short and stout Here is my handle Here is my spout.
Save the document and check its status.
Add the teapot.txt document.
Create a second document called teapot2.txt with this text (you could also create the document outside the command line):
- When I get all steamed up Hear me shout 'Tip me over and pour me out!'.
(Note that you used single quotation marks because the double ones are already used in the command to create the document, if you do it from the command line.)
Add the teapot.txt document.
Commit both documents with the following commit-message: “add teapot lyrics”.
Run git status to check if your commit has worked.
Run git log to see the identifier and the commit message.
Conclusion
Git is an essential tool for version control, enabling efficient collaboration and tracking changes in projects, especially those involving text-based files. By mastering basic Git commands, you can manage project versions, track revisions, and synchronise work among multiple contributors. Understanding these foundational concepts and workflows will not only help in maintaining a clean project history but also improve team collaboration, whether you’re working from the command line, GitHub, or a desktop interface. Embracing Git as part of your workflow helps you to manage projects confidently, restore previous versions, and merge contributions seamlessly.
End note
This resource was originally published to the ACDH-CH ‘HowTo’ internal training platform on 5th November 2023. The publication date of this present resource reflects the date it was migrated to DARIAH-Campus.
Links
Cheatsheets
Git commands Github: https://education.github.com/git-cheat-sheet-education.pdf
Git commands Gitlab: https://about.gitlab.com/images/press/git-cheat-sheet.pdf